Manual Setup
CloudZero supports manual AWS configuration for organizations that need more control over the setup process. You get the same cost data and capabilities as the automated method.
For most organizations, the automated setup is the fastest way to connect. Use manual setup when your organization requires custom provisioning workflows (Terraform, shell scripts, CLI, or the AWS Console).
Which account type do you need?
CloudZero uses two types of AWS connections:
| Account type | What it provides | Required? |
|---|---|---|
| Billing (Payer) | Cost and usage data from your AWS bill | Yes, connect this first |
| Resources (Member) | Resource metadata that powers detailed cost breakdowns and savings recommendations | Optional, but recommended |
Prerequisites
- AWS Organizations with consolidated billing enabled
- For Billing connections: a Cost and Usage Report in the required format in your AWS Payer account. CloudZero supports both CSV and Parquet; if your tags rely on capitalization differences, see Tag normalization in Parquet
- CloudZero user with data configuration permissions
- If you have resources in AWS regions where STS is not active by default (for example,
ap-east-1oreu-south-1), activate STS for those regions
All CloudZero access to your AWS accounts is read-only. For details on permissions, IAM policies, and CloudFormation templates, see AWS Permissions and Security.
Step 1: Start the connection in CloudZero
- In CloudZero, go to Settings > Cloud Connections.
- Select Create Connection +.
- Select the AWS tile, then choose Manual Setup under the account type you are connecting.
Keep this screen open. You need the External ID and generated policy in Step 2. Billing connections also use the IAM Policy Generator on this screen.
Step 2: Set up AWS permissions
Create an IAM role in AWS that grants CloudZero read-only access to your data, and attach the policy that CloudZero generates for you. Follow the section that matches the account type you selected in Step 1.
Make sure you are signed into the correct AWS account before creating the role. For a Billing (Payer) connection, sign into your Management or Payer account. For a Resources (Member) connection, sign into the member account you want to connect.
For a Billing (Payer) Account
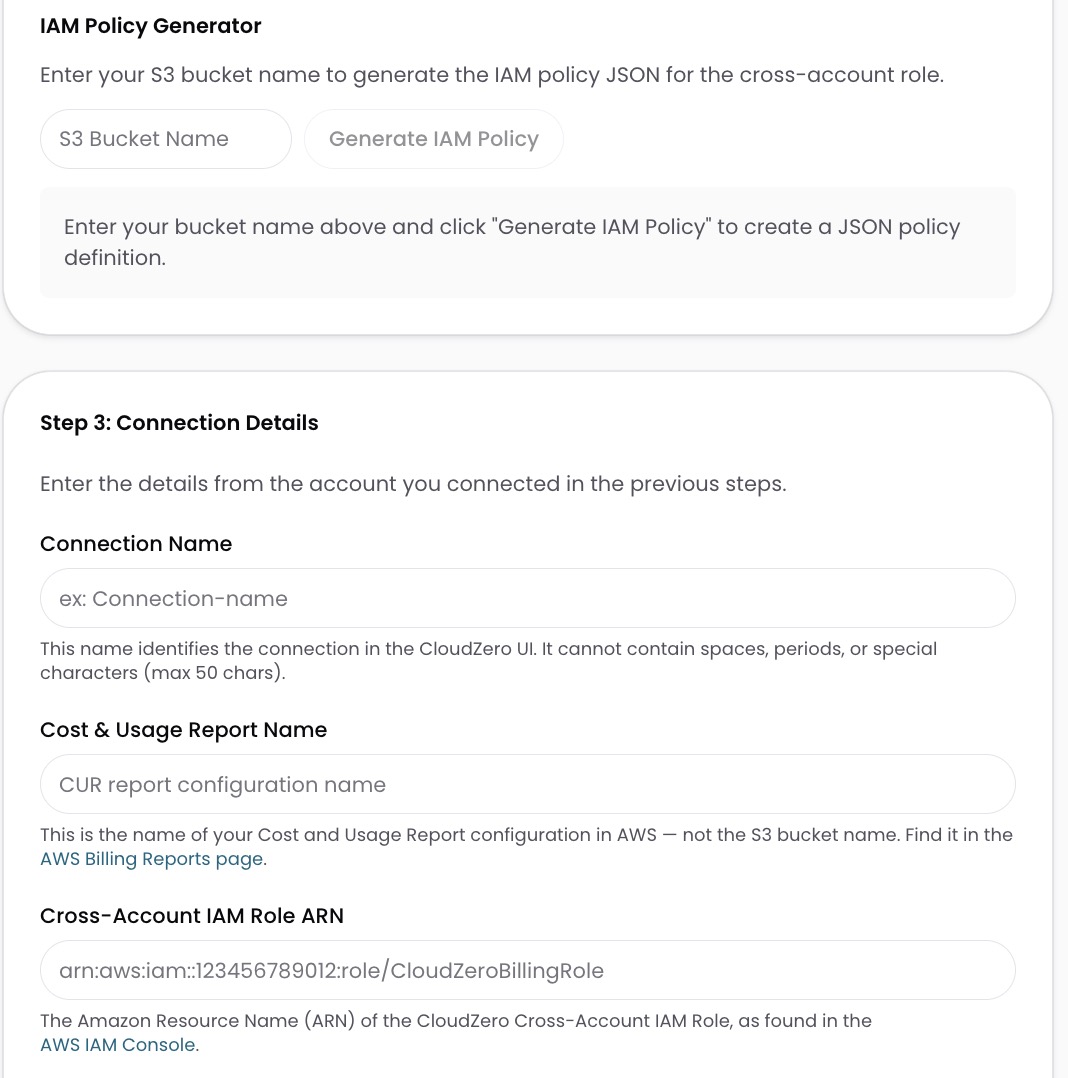
- In the CloudZero connection screen, enter the S3 Bucket Name where your Cost and Usage Report is stored.
- Select Generate IAM Policy. CloudZero generates the complete policy scoped to your bucket.
- In the AWS IAM Console, select Create role.
- For Trusted entity type, select Another AWS account (this lets CloudZero access your data across accounts).
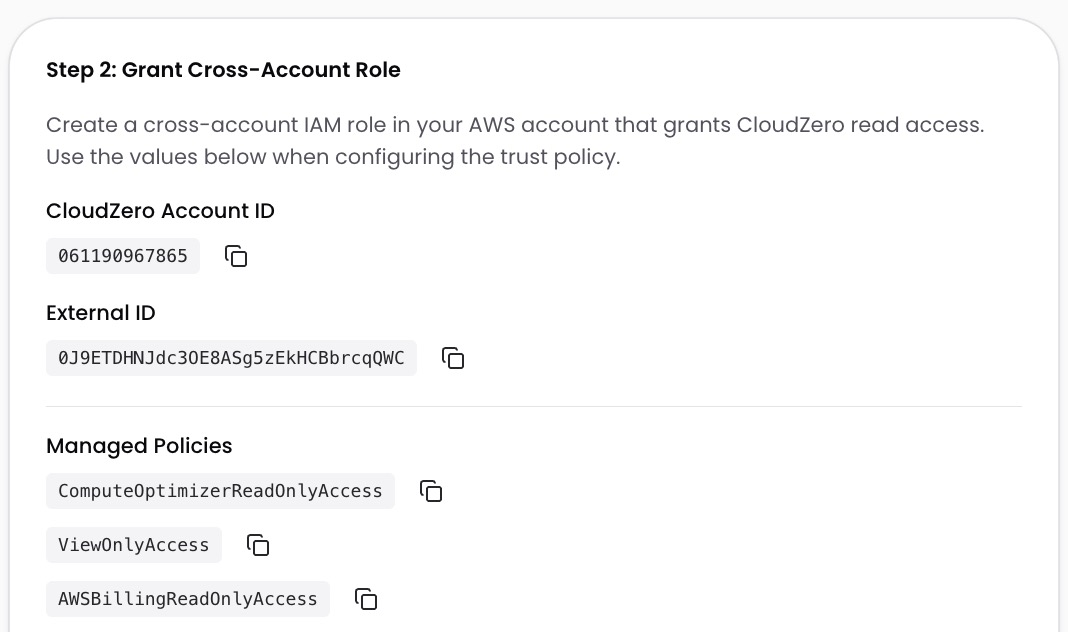
- Enter the CloudZero account ID:
061190967865. - Check Require external ID.
- Enter the External ID from the CloudZero connection screen.
- Attach the following AWS managed policies: ComputeOptimizerReadOnlyAccess, ViewOnlyAccess, and AWSBillingReadOnlyAccess.
- Complete the role creation wizard.
- Open the role you just created in the AWS IAM Console.
- Add the generated policy to the role by pasting the JSON from the CloudZero connection screen.
For a Resources (Member) Account
Connect a Billing (Payer) Account before adding Resources (Member) accounts.
- In the AWS IAM Console, select Create role.
- For Trusted entity type, select Another AWS account (this lets CloudZero access your data across accounts).
- Enter the CloudZero account ID:
061190967865. - Check Require external ID.
- Enter the External ID from the CloudZero connection screen.
- Attach the following AWS managed policies: ComputeOptimizerReadOnlyAccess, ViewOnlyAccess, and AWSBillingReadOnlyAccess.
- Complete the role creation wizard.
- Open the role you just created in the AWS IAM Console.
- Add the generated policy from the CloudZero connection screen to the role by pasting the JSON.
Step 3: Enter connection details in CloudZero
Complete the section that matches your account type.
For a Billing (Payer) Account
- Enter a Connection Name (for example,
my-aws-billing). No spaces, periods, or special characters (max 50 characters). - Enter the Cost and Usage Report Name, the name of your CUR configuration in AWS (not the S3 bucket name). You can find this in the AWS Cost and Usage Reports console.
- Select the Cost and Usage Report Format that matches your CUR in AWS (CSV or Parquet). If the selected format does not match your CUR's export format, no data flows in. Check your AWS Cost and Usage Reports settings if you are unsure.
- Enter the Cross-Account IAM Role ARN of the role you created. You can find this on the role's summary page in the AWS IAM Console.
- Select Save & Continue.
For a Resources (Member) Account
- Enter a Connection Name (for example,
my-aws-resources). No spaces, periods, or special characters (max 50 characters). - Enter the Cross-Account IAM Role ARN of the role you created. You can find this on the role's summary page in the AWS IAM Console.
- Select Save & Continue.
Step 4: Verify the connection
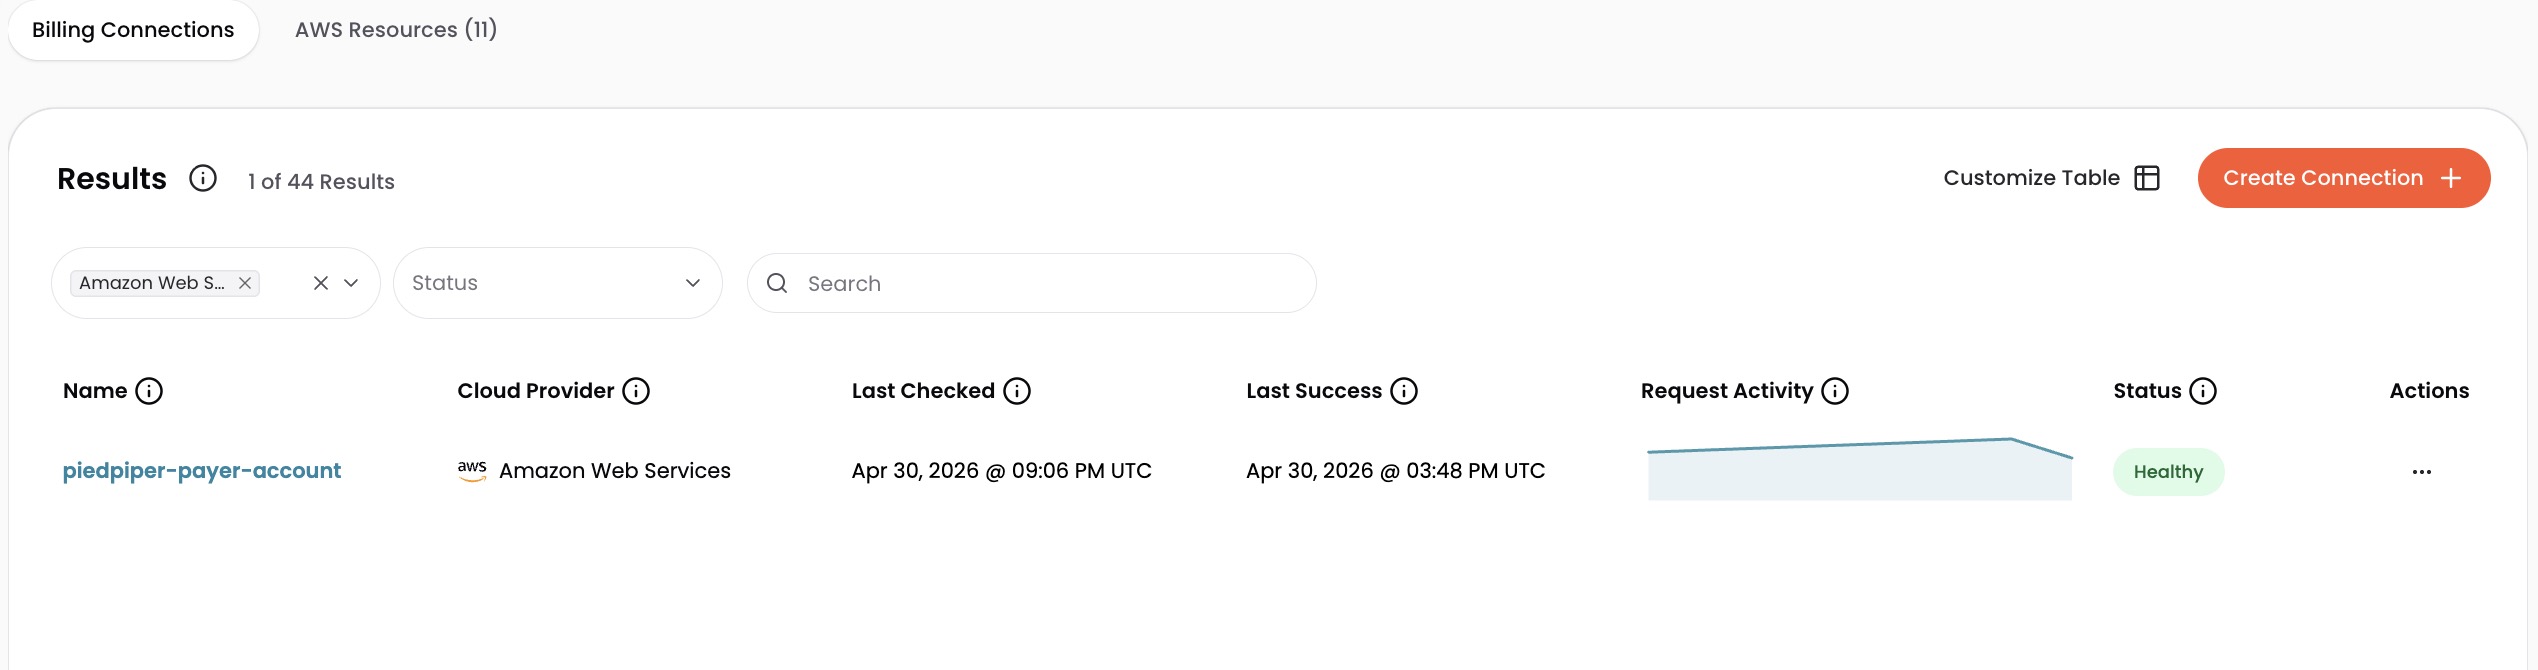
Check the connection status on the Cloud Connections page. Billing connections appear in the Billing Connections table and resource connections appear in the AWS Resources tab. The Status column shows a green healthy indicator when the connection is active.
What to expect
Your cost data appears across the platform within 24 hours.
You can connect additional AWS accounts at any time by repeating this process. To connect many resource accounts at once, see Connect Resource Accounts at Scale. CloudZero supports organizations with multiple Management Accounts.
If your organization uses AWS resource tags, you can bring them into CloudZero for additional filtering and grouping options. See Use AWS Tags in CloudZero.
Have questions or feedback? Reach out to your account manager.
Updated 23 days ago