

Filter by SSO Login Attribute
When you add a data access filter to a Limited Access Role, you can filter by an SSO login attribute so that the filter values resolve at login from each user's single sign-on (SSO) attributes, instead of being fixed when you create the Role. This lets one Role serve many users, where each user sees only the data their attributes allow.
For example, instead of creating a separate Role for every team, you create one Limited Access Role that maps the team Dimension to the team attribute from your identity provider (IdP). At login, a user whose token contains team=engineering sees only engineering data, while a user with team=sales sees only sales data, with no additional Roles to maintain.
For an overview of Roles and data access levels, see Users & Permissions.
How it works
- You add a custom claim to the OpenID Connect (OIDC) tokens your IdP issues. The claim's value is the user attribute you want to filter on, such as a team name, department code, or list of account IDs.
- In CloudZero, you add an access filter to a Limited Access Role and set Filter by to SSO login attribute, mapping a Dimension to the SSO attribute.
- At each login, CloudZero reads the attribute from the user's token and applies its value(s) as the filter for that Dimension.
Key characteristics:
- Resolves per user, at login. When a user's IdP attribute changes, the new value takes effect the next time they sign in, with no CloudZero changes required.
- Safe by default. If the mapped attribute is missing or empty for a user, that user sees no data for the filter. Access is never widened by a missing attribute.
- An alternative to fixed values. For each filter, you set Filter by to either Fixed values or SSO login attribute, not both.
Filtering by SSO login attribute applies only to Limited Access Roles, and the option appears only for organizations with an active SSO integration. See Users & Permissions and Single Sign-On.
Before you begin
- An active SSO integration (OIDC, or SAML bridged to OIDC). See Single Sign-On.
- Permission to create or edit Roles in CloudZero. See View and Manage Roles.
- The Dimension you want to filter on must already exist in your data. If a user's attribute value does not match any value in that Dimension, they see no data.
Step 1: Add a custom claim in your IdP
Configure your IdP to include a custom claim in the OIDC ID token it sends to CloudZero. You choose the claim name and map it to the user attribute you want to filter on. In CloudZero, this claim appears as an SSO login attribute that you select when creating a filter.
Choosing a claim name
- A simple key such as
teamordepartmentworks. You reference this exact key in CloudZero, so use whatever name appears in the issued token. - Some IdP and Auth0 configurations require custom claims to be namespaced with a URL, for example
https://cloudzero.com/team. If yours does, use the full namespaced key as the claim name, both in your IdP and in CloudZero.
Supported claim value formats
CloudZero normalizes claim values from the common IdP conventions:
| Value in the token | Interpreted as |
|---|---|
engineering | Single value: engineering |
eng,platform | Comma-delimited list: eng, platform |
["eng","platform"] | JSON array: eng, platform |
When a claim carries multiple values, the user can see data matching any of those values.
Because comma-delimited strings are split on commas, a single value that itself contains a comma (for example, a team named
Research, Development) is split into two values. Avoid commas within individual claim values, or send the values as a JSON array instead.
Okta
To add a custom claim in Okta:
- In Okta, navigate to Security > API > Authorization Servers and select the authorization server used for CloudZero (usually the default server).
- Select Claims > Add Claim.
- Enter a Name for the claim. This is the name you reference in CloudZero, for example
team. - In Include in token type, select ID Token.
- Set Value type to Expression, and enter an Okta Expression Language expression that returns the attribute you want to filter on (for example,
user.teamor a profile attribute mapped from your directory). - Set Include in to Any scope.
- Select Create.
Microsoft Entra ID (Azure AD)
To add a custom claim in Microsoft Entra ID (Azure AD):
- In the Microsoft Entra admin center, open App registrations and select the application used for your CloudZero SSO integration.
- Select Token configuration > Add optional claim.
- Choose ID as the token type, select the directory attribute to expose (or add a claim backed by a user attribute or group), and save.
- Note the resulting claim name. This is the name you reference in CloudZero. If your configuration emits the claim under a namespace, use the full namespaced name.
Other OIDC providers
Add a custom claim to the ID token following your IdP's documentation. The claim name you configure is the name you reference in CloudZero, and its value should be the attribute you want to filter on (a single value, a comma-delimited list, or a JSON array).
Step 2: Verify CloudZero receives your attribute
After you change a claim in your IdP, sign out of CloudZero and sign back in. CloudZero reads your attributes from the token issued at login, so an updated attribute takes effect only after you re-authenticate.
When you configure an SSO login attribute filter in Step 3, CloudZero previews the SSO attributes it currently sees for you as the signed-in user. Use this preview to confirm your setup:
- Your attribute appears with the expected value. If it does not, recheck your IdP configuration, then sign out of CloudZero and sign back in and try again.
- The attribute value matches how it appears in your CloudZero Dimension data. Mismatches, including differences in spelling, casing, or extra whitespace, result in the user seeing no data.
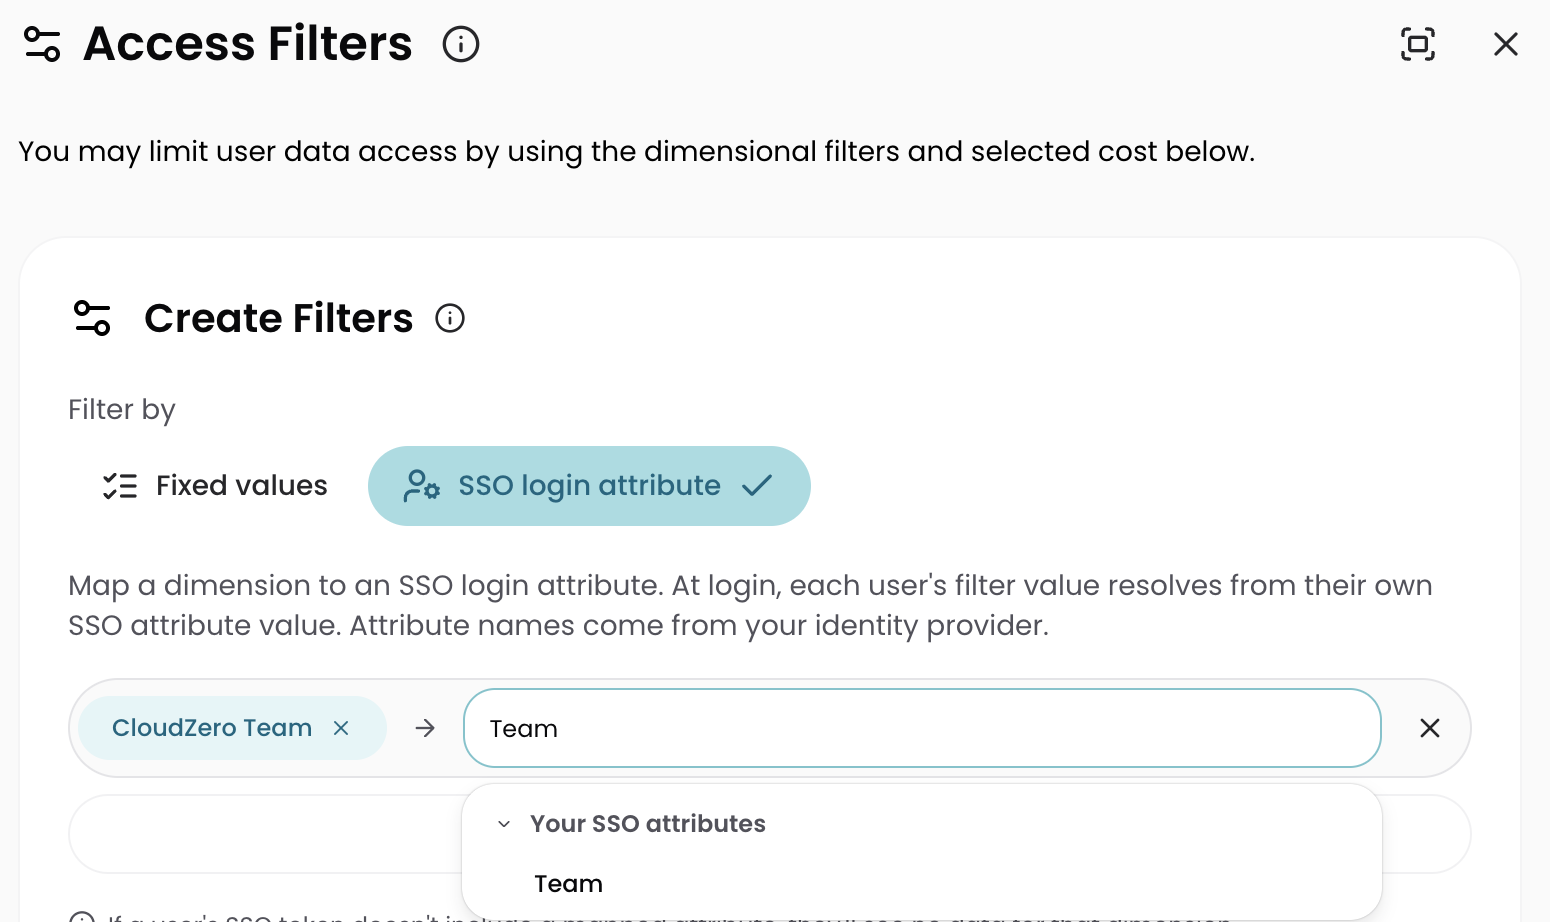
Step 3: Filter a Limited Access Role by SSO login attribute
- Create or edit a Limited Access Role. See Configure Limited Access Role.
- In the Access Filters section, under Create Filters, set Filter by to SSO login attribute.
- Select the Dimension you want to restrict, then specify the SSO attribute that carries the values. CloudZero shows the attributes it currently sees for your account, so you can confirm the expected attribute is available before saving.
- Save the Role and assign users to it.
Users assigned to the Role see filtered data starting at their next sign-in.
You can also configure this filter through the API using the dynamic_filter_dimensions field on the data access filter. This field maps a Dimension to a claim name, for example {"CZ:Tag:team": "team"}. See the Create Role API reference.
Troubleshooting
| Symptom | Likely cause and fix |
|---|---|
| A user sees no data | The mapped attribute is missing or empty in their token (this is the safe default). Confirm the attribute is present in the token and that the user's IdP attribute is populated. |
| A user still sees no data, but the attribute is present | The attribute value does not match any value in the Dimension. Check for differences in spelling, casing, or whitespace between the attribute value and your Dimension data. |
| The attribute name isn't recognized | The name in the CloudZero filter must match the attribute name in the token exactly, including any namespace prefix such as https://cloudzero.com/. |
| A single value is split into two | The value contains a comma and was split as a list. Remove commas from individual values, or send the values as a JSON array. |
| Changes to a user's attribute aren't reflected | Filters resolve at login. Have the user sign out and sign back in so a fresh token is issued. |
Have questions or feedback? Reach out to your account manager.
Updated 3 months ago