SSO with SAML
CloudZero supports single sign-on (SSO) using SAML 2.0 with any identity provider (IdP) that supports SAML, including Okta. This enables users to log in to CloudZero from their IdP without needing to enter a CloudZero username and password. For OIDC, see the Okta or OpenID Connect setup guides.
What you need
- Administrator access to your SAML identity provider
- Permission to manage SSO integrations in CloudZero
Overview
To set up a new SSO integration for CloudZero using SAML, complete the following steps:
- Open the SAML SSO setup page
- Configure CloudZero as a SAML application in your IdP
- Complete configuration in CloudZero
- Test your SAML configuration
- Enable seamless login
Step 1: Open the SAML SSO setup page
- Log in to CloudZero and navigate to Settings > SSO Integrations.
- Select Create New Integration.
- Select SAML from the list of options.
CloudZero displays the Connect SAML to CloudZero screen with the values you will need to configure your IdP:
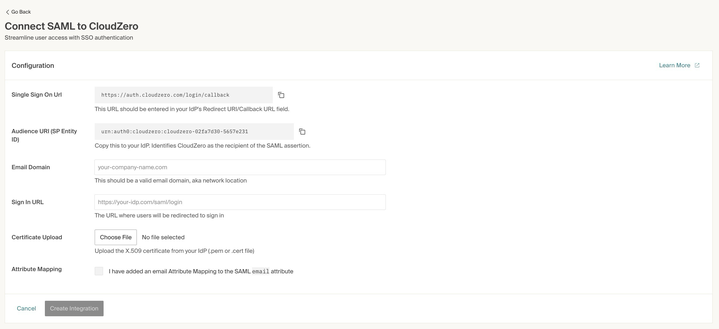
| Field | Description |
|---|---|
| Single Sign on URL | The Assertion Consumer Service (ACS) endpoint where your IdP sends the SAML response after authentication |
| Audience URI (SP Entity ID) | A unique identifier for CloudZero as the SAML service provider |
| Email Domain | The allowed email domain(s) for users authenticating through this SAML connection |
| Sign In URL | The login URL of your IdP, where CloudZero redirects users to authenticate |
| Certificate Upload | The X.509 certificate from your IdP, used to validate the digital signature on SAML assertions |
| Attribute Mapping | Confirms your IdP includes an email attribute in the SAML assertion payload |
Step 2: Configure CloudZero as a SAML application in your IdP
Set up CloudZero as a SAML application in your IdP. For IdP-specific guidance, see the documentation for Okta or Microsoft Entra ID.
- Copy the Single Sign-on URL and the Audience URI (SP Entity ID) from the CloudZero screen.
- Register CloudZero as a SAML application in your IdP using the values you copied. Enter the entire Audience URI string.
- Download an X.509 certificate from your IdP (
.pemor.certfile). - Configure a SAML attribute named
email(for example,<saml:Attribute Name="email" ...>) mapped to the CloudZero application.
Step 3: Complete configuration in CloudZero
- Return to the Connect SAML to CloudZero screen in CloudZero.
- Enter your company's email domain into the Email Domain field.
- Paste the SAML Sign-On URL from your IdP into the Sign In URL field.
- Select Upload File next to the Certificate Upload field and upload the signing certificate from your IdP.
- Check the Attribute Mapping checkbox to confirm you have configured the
emailattribute in your IdP. - Select Create Integration.
- If the integration succeeds, CloudZero returns you to the SSO Integrations page. If it fails, verify your configuration details and try again. If the problem persists, contact your account manager or email [email protected].
Step 4: Test your SAML configuration
- Do not close or log out of your current CloudZero session.
- Open a private browser or incognito window and navigate to https://app.cloudzero.com/.
- Enter your email address. If your SSO connection is configured correctly, you will be redirected to your IdP.
- Enter your login credentials. If you can complete the login, your configuration is correct.
Step 5: Enable seamless login
After your SAML integration is working, configure your IdP so users can log in to CloudZero directly from their SSO dashboard. The steps differ by IdP:
- Okta requires updating two separate applications (a SAML app and a bookmark app). See Option A.
- All other IdPs require updating the callback URL and bookmark URL in a single application. See Option B.
Both options start by copying the Bookmark URL from CloudZero:
-
In CloudZero, navigate to Settings > SSO Integrations and select your SAML integration.
-
Copy the Bookmark URL in the General Configuration section. This is the URL your users will use to access CloudZero. It follows this format:
https://app.cloudzero.com/?connection=<your-connection-name>
Option A: Okta
Okta SAML integrations use two separate applications: a SAML app for authentication and a bookmark app for the login tile. Update both:
- In Okta, navigate to Admin Console > Applications > Applications.
- Select your CloudZero SAML application (not the bookmark app).
- In the General tab, scroll down to SAML Settings and select Edit.
- Verify the Single Sign On URL is set to
https://auth.cloudzero.com/login/callback. - If the Recipient URL and Destination URL fields are filled out, verify they also use
https://auth.cloudzero.com/login/callback. Otherwise, leave them blank. - Select Save.
- Navigate to Admin Console > Applications > Applications and select your CloudZero bookmark app.
- In the General tab, scroll down to App Settings and select Edit.
- Set the URL field to the bookmark URL you copied from CloudZero.
- Select Save.
Option B: Other IdPs
You must update the callback URL and bookmark URL at the same time. If you save the callback URL before adding the bookmark URL, your users will not be able to log in to CloudZero until the bookmark URL is also saved. Contact your account manager to restore access.
- Log in to your SAML IdP and select the CloudZero SSO application.
- Verify the Redirect URI is set to
https://auth.cloudzero.com/login/callback. - Set the Bookmark URL field to the bookmark URL you copied from CloudZero. This field may be labeled Initiate Login URL or Website URL depending on your IdP.
- Save your IdP settings.
What to expect
Users can now log in to CloudZero through their IdP. CloudZero uses Just-in-Time provisioning, so any user granted access in your IdP receives a CloudZero account automatically on first login.
Have questions or feedback? Reach out to your account manager.
Updated about 2 months ago