Telemetry Stream CSV Import
A telemetry stream provides CloudZero with cloud usage data to help you ensure your business is maximizing profit when delivering cloud-based services. CloudZero allows you to create and update a unit cost metric or allocation telemetry stream through the user interface by uploading a CSV file with telemetry data. This can be a convenient alternative to sending telemetry stream data to the CloudZero API.

The maximum CSV file size is 3MB.
Unit Cost Metric versus Allocation
When you create a telemetry stream, it is important to understand the difference between a unit cost metric and an allocation, and when it is appropriate to use each one.
Unit Cost Metric overview
A unit cost metric is a measurement of how efficiently your company is operating in the cloud, calculated as cloud cost divided by unit of demand. You can choose the unit of demand that is appropriate to track for your business. For example, if you are a food delivery platform, your unit of demand might be the number of orders processed. The unit cost metric, then, is your cost per order.
Tracking unit cost metrics helps you gauge whether your business is operating efficiently. Even if your total cloud costs increase, a decreased unit cost metric indicates that your business is scaling efficiently, because you are spending less money to process each transaction.
You can associate a unit cost metric with the cost data for a particular dimension, such as products your company sells. This allows you to further refine your analysis by determining cost per order per product, for example.
Allocation overview
In contrast, an allocation is a way to split cloud costs into new categories based on actual usage. For example, if you have an AWS RDS database that is shared across engineering teams, you can create an allocation that assigns the actual number of RDS writes to a given team name. You could then reference one or more allocation streams directly in your CostFormation definitions as a source of data when crafting Custom Dimensions. Each element name defined in your stream, in this case, an engineering team's name, corresponds to an element that exists within the Dimension. In this example, Team Alpha is an element in the Engineering Team Dimension.
You can associate an allocation with an additional Dimension's cost data. For example, you might want to see each engineering team's RDS usage split across a Product Dimension. This allows you to determine how much money each team is spending on RDS to develop each of your company's products, for example.
To learn how unit cost metrics and allocations can help you manage cloud costs more efficiently, see What Is Cloud Unit Economics (CUE)? A Comprehensive And, More Importantly, Fun Guide.
Create a Unit Cost Metric Telemetry Stream in the CloudZero UI
A unit cost metric telemetry stream sends CloudZero the data required to calculate a unit cost metric for your organization. For example, you can use the CloudZero UI to upload a CSV file that lists your number of orders per day or per month. After you create a unit cost metric stream, you can create Analytics dashboards to track your unit cost metrics over time.
Upload the Unit Cost Metric CSV file
Include the following data in each row of the CSV file you intend to upload:
- Required: Timestamp in any format. For example,
2024-09-01or2024-09-01T12:00:00Z. - Required: Unit value. Must be greater than 0. For example,
200to represent the number of orders for that day or month. - Optional: Up to five dimension elements (one per column). This allows you to associate additional cost data with the unit cost metric you create. For example, if you provide an
Engineering Teamcolumn, you can associate each engineering team value in the column with thecost per orderin order to calculate thecost per order per engineering team.
The first row of the CSV file should list the column names, and you can use any names you like.
To create a unit cost metric telemetry stream by uploading a CSV to the CloudZero UI:
-
Navigate to Settings > Telemetry Streams.
-
Select Create New Stream > New Unit Cost Metric Stream.

-
Enter a stream Name, such as
engineering-team-orders. You cannot change this value after you create the stream. The name can include up to 256 letters, digits, underscores, periods, or hyphens in any combination. -
Optionally, enter a Description for the stream.
-
Set Granularity of data in the stream to Daily (default) or Monthly. You cannot change this setting after you create the stream.
Granularity determines the time period used to track data changes:
- Daily granularity lets you track how unit values change from day to day.
- Monthly granularity lets you track how unit values change from month to month.
Any data provided at a finer level of granularity will be aggregated. For example, if you provide hourly data but choose Daily, all of the hourly values for a given metric will be combined into a single value for the day.
-
Optionally, check the Fill gaps in time? box to allow CloudZero to add data for missing timestamps based on data for the preceding timestamp. The added data will appear in Analytics and the Explorer.
With this setting enabled, if your stream's granularity is set to monthly and you provide data for January, February, and April but not March, for example, CloudZero uses the value of the preceding timestamp to fill in the missing month:
- January: 20
- February: 23
- March: 23 (value copied from February)
- April: 25
Likewise, if your stream's granularity is set to daily and you provide data for July 1, 2, and 5, CloudZero creates timestamps for July 3 and 4 using the value from July 2:
- July 1: 150
- July 2: 100
- July 3: 100 (value copied from July 2)
- July 4: 100 (value copied from July 2)
- July 5: 75
-
In the Upload CSV File section, select your CSV file or drag and drop the file into the field. You can replace the CSV file with a new one at any point before creating the stream. The maximum file size is 3MB.

-
Select the Timestamp drop-down menu to choose the timestamps column from your CSV file.
-
Select the Unit value drop-down menu to choose the unit values column from your CSV file.
-
Optionally, select a target Dimension from the Target Dimension (Optional) drop-down menu. This menu displays all of your organization's Dimensions, including CloudZero-defined and user-defined Dimensions.
Selecting a target Dimension enables you to associate the metric with cost data from a specific Dimension so you can determine the cost per unit per Dimension element. For example, you can select an
Engineering TeamDimension to calculatecost per order per engineering team.-
If you selected a target Dimension, you must select an elements column in your CSV from the Dimension Element drop-down menu. This column provides the values that correspond to the target Dimension. For example, if your CSV file has a
Teamcolumn that includes a value such asTeam AlphaorTeam Betafor each row, select theTeamcolumn from this drop-down menu. -
Optionally, select the + (plus sign) beneath the first target Dimension to add more target Dimensions and elements. Any CSV columns not mapped to a Dimension will be ignored when the stream is created.
Note that you cannot change the target dimensions after you create the stream.

-
-
Ensure the CSV Reference Table shows your data as you expect it and that there are no errors displayed.

If there is an error message, such as a type mismatch, you can select an invalid value in the CSV Reference Table and type in a new value. You can also reassign columns or upload a new CSV file.
-
Optionally, select Export to CSV to download a copy of the data in the CSV Reference Table. This is useful if you have manually edited any cell values to resolve errors and want to download a CSV file that includes the updated data.
-
Select Save.
After CloudZero creates your stream, you are redirected to the Telemetry Streams page, where you can see your new unit cost metric stream in the table. Its status will change from Pending to Available after CloudZero ingests the data.
Note that it can take up to 24 hours for CloudZero to ingest the data from a new stream.

View the Unit Cost Metric Stream details
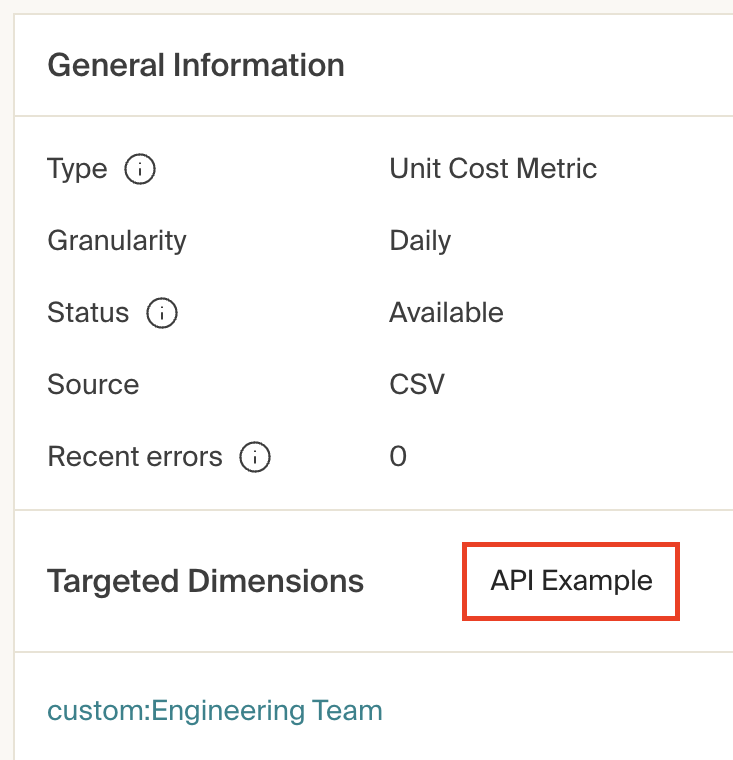
From the Telemetry Streams page, you can select the name of a unit cost metric stream to view its details page, where you can take the following actions:
- Add and/or replace records by uploading another CSV file
- Update the stream description
- Delete the stream
- Download a CSV file of recent records (the last seven days)
- View information about the stream, including:
- Stream type (
Unit Cost Metric) - Granularity of data (
DailyorMonthly) - Status (
PendingorAvailable) - Source (
CSVand/orAPI) - Targeted dimensions
- Activity of records ingestion
- An example of a payload you can send to the CloudZero API (streams with target dimensions only)
- Stream type (

View example Unit Cost Metric API payload
If you configured the unit cost metric stream with one or more target Dimensions, you can view a sample API payload by selecting the API Example button near the Targeted Dimensions list.

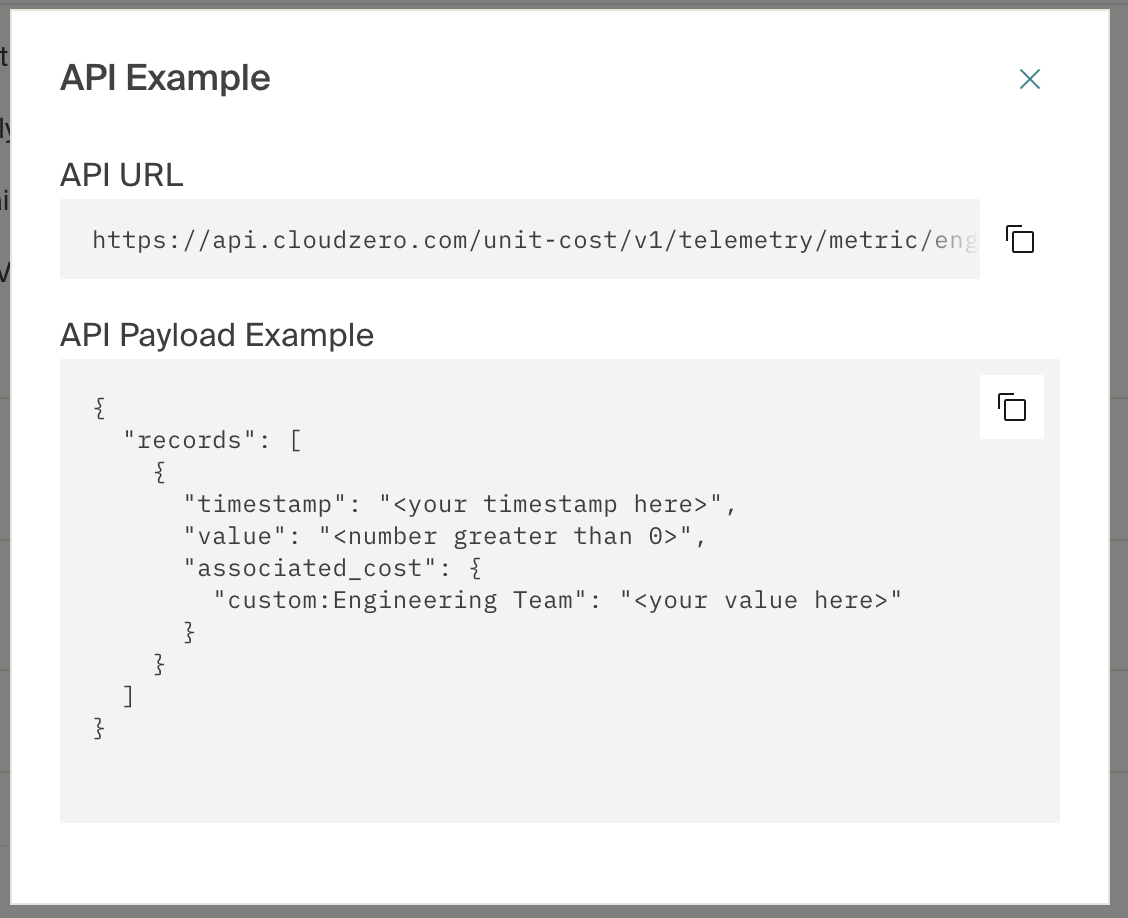
The API example includes the following information:
-
The API URL of your unit cost metric stream, for example:
https://api.cloudzero.com/unit-cost/v1/telemetry/metric/{your-unit-cost-stream-name}. To post records to your stream using a specific type of operation, append the following paths to your API URL: -
A sample payload for the predecing operations, pre-filled with your granularity settings and associated costs (target Dimensions). For example:
{
    "records": [
        {
            "timestamp": "<your timestamp here>",
            "value": "<number greater than 0>",
            "associated_cost": {
                "custom:Engineering Team": "<your value here>"
            }
        }
    ]
}

Update the Unit Cost Metric Stream
You can update the unit cost metric stream by uploading a new CSV file. The CSV file adds new records or replaces existing ones based on the record date:
- If a record in the CSV file has the same data as an existing record except for the unit value, the CSV record will replace (overwrite) the existing record.
- If a record in the CSV file has data that does not match any existing records, the CSV record will be added as a new entry.
To add and or replace records in a unit cost metric stream:
-
From the Telemetry Streams page, select the name of the unit cost metric stream you want to update.
-
Optionally, update the stream Description.
-
Optionally, check the Fill gaps in time? box to allow CloudZero to add data for missing timestamps based on data for the preceding timestamp.
-
In the Upload CSV section, select your CSV file or drag and drop the file into the field. You can replace the CSV file with a new one at any point before you select Update.

-
Select the Timestamps drop-down menu to choose the timestamps column from your CSV file.
-
Select the Unit value drop-down menu to choose the unit values column from your CSV file.
-
If you selected a target Dimension when you created the stream, select the corresponding elements column in your CSV file from the Dimension Element drop-down menu.

-
Ensure the CSV Reference Table shows your data as you expect it and that there are no errors displayed.
If there is an error message, such as a type mismatch, you can select an invalid value in the CSV Reference Table and type in a new value. You can also remap columns or upload a new CSV file.
-
Optionally, select Export to CSV to download a copy of the data in the CSV Reference Table. This is useful if you have manually edited any cell values to resolve errors and want to download a CSV that includes the updated data.
-
Select Update.
CloudZero displays a message stating how many records it successfully updated. The updated records appear in CloudZero after the next data ingest.
Create an Allocation Telemetry Stream in the CloudZero UI
An allocation telemetry stream sends CloudZero the data required to calculate an allocation. For example, you can use the CloudZero UI to upload a CSV file that lists the number of RDS writes per day or per month for each engineering team. After you create an allocation stream, you can create a custom dimension from it using CostFormation.
Upload the Allocation CSV File
Include the following data in each row of the CSV you intend to upload:
- Required: Timestamp in any format. For example,
2024-09-01or2024-09-01T12:00:00Z. - Required: Allocation value. Must be greater than 0. For example,
1000to represent the number of RDS writes for that day or month. - Required: Element name. For example,
Team Alphato associate the number of RDS writes per day with the Alpha engineering team. - Optional: Up to five dimension elements (one per column). This allows you to associate additional data sources with the allocation. For example, if you provide a
Productcolumn, you can associate each product in the column with the number of RDS writes per team in order to calculate the number of RDS writes per team per product.
The first row of the CSV file should list the column names, and you can use any names you like.
To create an allocation telemetry stream by uploading a CSV file to the CloudZero UI:
-
Navigate to Settings > Telemetry Streams.
-
Select Create New Stream > New Allocation Stream.

-
Enter a stream Name, such as
rds-writes-by-team. You cannot change this value after you create the stream. The name can include up to 256 letters, digits, underscores, periods, or hyphens in any combination. -
Optionally, enter a Description for the stream.
-
Set Granularity of data in the stream to Hourly, Daily (default), or Monthly. You cannot change this value after you create the stream.
Granularity determines the time period used to track data changes:
- Hourly granularity lets you track how allocation values change from hour to hour.
- Daily granularity lets you track how allocation values change from day to day.
- Monthly granularity lets you track how allocation values change from month to month.
Any data provided at a finer level of granularity will be aggregated. For example, if you provide hourly data but choose Daily, all of the hourly values for a given element will be combined into a single value for the day.
-
Optionally, check the Fill gaps in time? box to allow CloudZero to add data for missing timestamps based on data for the preceding timestamp. The added data will appear in Analytics and Explorer.
With this setting enabled, if your stream's granularity is set to monthly and you provide data for January, February, and April but not March, for example, CloudZero uses the value of the preceding timestamp to fill in the missing month:
- January: 20
- February: 23
- March: 23 (value copied from February)
- April: 25
Likewise, if your stream's granularity is set to daily and you provide data for July 1, 2, and 5, CloudZero creates timestamps for July 3 and 4 using the value from July 2:
- July 1: 150
- July 2: 100
- July 3: 100 (value copied from July 2)
- July 4: 100 (value copied from July 2)
- July 5: 75
-
In the Upload CSV File section, select your CSV file or drag and drop the file into the field. You can replace the CSV file with a new one at any point before creating the stream. The maximum file size is 3MB.

-
Select the Timestamp drop-down menu to choose the timestamps column from your CSV.
-
Select the Allocation value drop-down menu to choose the allocation values column from your CSV.
-
Select the Element name drop-down menu to choose the element names column from your CSV. If you use the allocation stream to create a Dimension later, these values become the element names in the dimension.
-
Optionally, select a target dimension from the Target Dimension (Optional) drop-down menu. This menu displays all of your organization's dimensions, including CloudZero-defined and user-defined Dimensions.
Selecting a target Dimension enables you to associate the allocation with cost data from an existing Dimension so you can group the allocated usage by each element in the selected Dimension. For example, you can select the
ProductDimension to calculatenumber of RDS writes per engineering team per product.-
If you selected a target Dimension, you must select an elements column in your CSV file from the Dimension Element drop-down menu. This column provides the values that correspond to the target dimension. For example, if your CSV file has a
Productcolumn that includes a value such asAnalyticsorAI Solutionsfor each row, select theProductcolumn from this drop-down. -
Optionally, select the + (plus sign) beneath the first target dimension to add more target Dimensions and elements. Any CSV columns not mapped to a Dimension will be ignored when the stream is created.
Note that you cannot change the target Dimensions after you create the stream.

-
-
Ensure the CSV Reference Table shows your data as you expect it and that there are no errors displayed.

If there is an error message, such as a type mismatch, you can select an invalid value in the CSV Reference Table and type in a new value. You can also remap columns or upload a new CSV file.
-
Optionally, select Export to CSV to download a copy of the data in the CSV Reference Table. This is useful if you have manually edited any cell values to resolve errors and want to download a CSV that includes the updated data.
-
Select Save.
After CloudZero creates your stream, you are redirected to the Telemetry Streams page, where you can see your new allocation stream in the table.Its status will change from Pending to Available after CloudZero ingests the data.
Note that it can take up to 24 hours for CloudZero to ingest the data from a new stream.

View the Allocation Stream Details
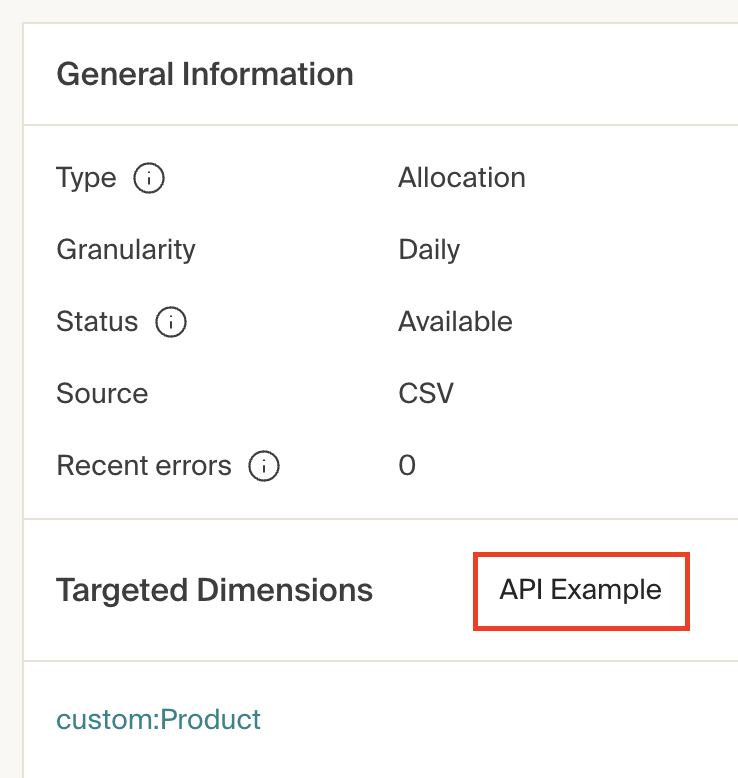
From the Telemetry Streams page, you can select the name of an allocation stream to view its details page, where you can take the following actions:
- Add and/or replace records by uploading another CSV file
- Update the stream description
- Delete the stream
- Download a CSV file of recent records (the last 7 days)
- View information about the stream, including:
- Stream type (
Allocation) - Granularity of data (
Daily,Hourly, orMonthly) - Status (
PendingorAvailable) - Source (
CSVand/orAPI) - Targeted dimensions
- Activity of records ingestion
- An example of a payload you can send to the CloudZero API (streams with target dimensions only)
- Stream type (

View example Allocation API payload
If you configured the allocation stream with one or more target Dimensions, you can view a sample API payload by selecting the API Example button near the Targeted Dimensions list.

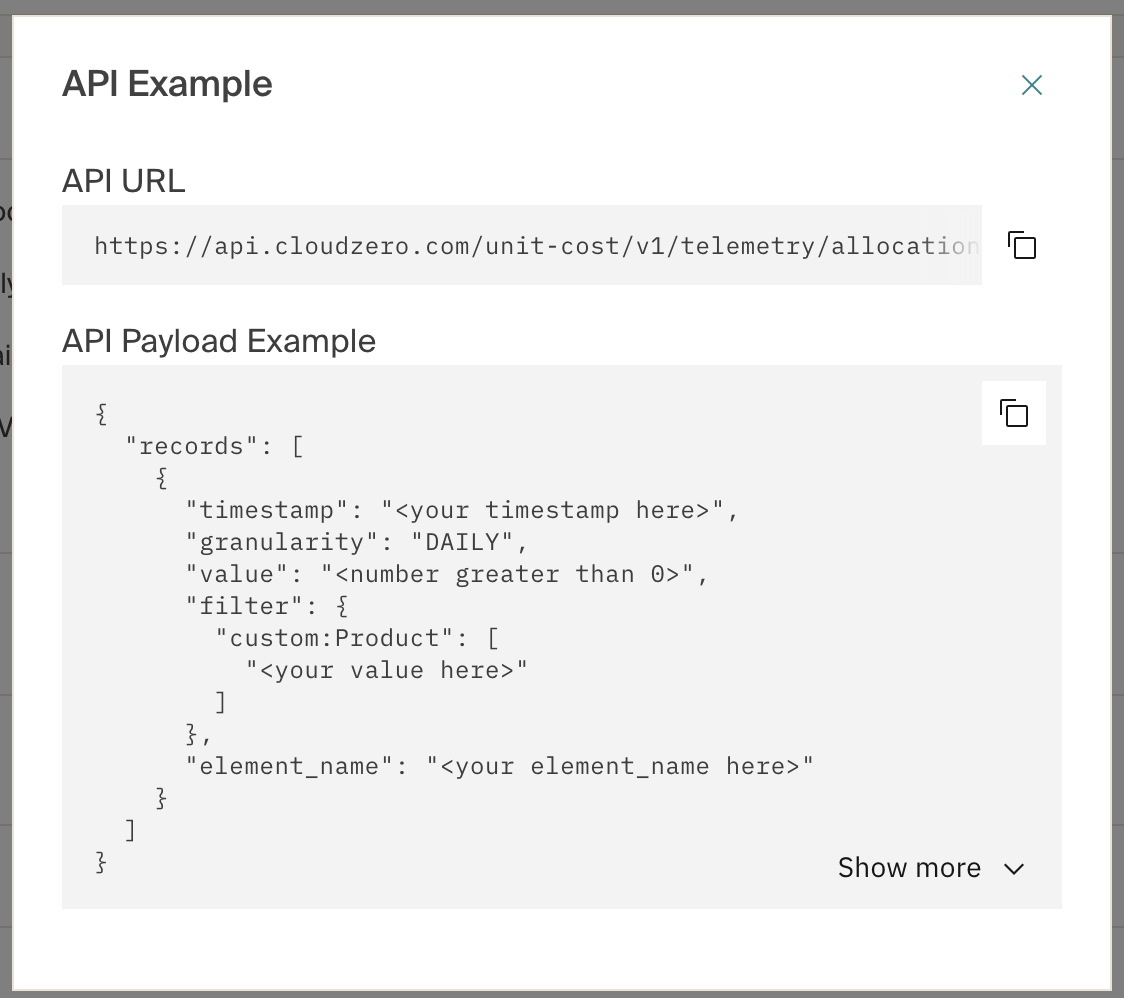
The API example includes the following information:
-
The base API URL of your allocation stream, for example:
https://api.cloudzero.com/unit-cost/v1/telemetry/allocation/{your-allocation-stream-name}. To post records to your stream using a specific type of operation, append the following paths to your API URL: -
A sample payload for the preceding operations, pre-filled with your granularity settings and filters (target dimensions). For example:
{
    "records": [
        {
            "timestamp": "<your timestamp here>",
            "granularity": "DAILY",
            "value": "<number greater than 0>",
            "filter": {
                "custom:Product": [
                    "<your value here>"
                ]
            },
            "element_name": "<your element_name here>"
        }
    ]
}

Update the Allocation Stream
You can update the allocation stream by uploading a new CSV file. The CSV file adds new records or replaces existing ones based on the record date:
- If a record in the CSV file has the same data as an existing record except for the allocation value, the CSV record will replace (overwrite) the existing record.
- If a record in the CSV file has data that does not match any existing records, the CSV record will be added as a new entry.
To add and or replace records in an allocation stream:
-
From the Telemetry Streams page, select the name of the allocation stream you want to update.
-
Optionally, update the stream Description.
-
Optionally, check the Fill gaps in time? box to allow CloudZero to add data for missing timestamps based on data for the preceding timestamp.
-
In the Upload CSV file section, select your CSV file or drag and drop the file into the field. You can replace the CSV with a new one at any point before you select Update.

-
Select the Timestamp drop-down menu to choose the timestamps column from your CSV.
-
Select the Allocation Value drop-down menu to choose the allocation values column from your CSV file.
-
Select the Element name drop-down menu to choose the element names column from your CSV file.
-
If you selected a target Dimension when you created the stream, select the corresponding elements column in your CSV file from the drop-down menu.

-
Ensure the CSV Reference Table shows your data as you expect it and that there are no errors displayed.
If there is an error message, such as a type mismatch, you can select an invalid value in the CSV Reference Table and type in a new value. You can also remap columns or upload a new CSV file.
-
Optionally, select Export to CSV to download a copy of the data in the CSV Reference Table. This is useful if you have manually edited any cell values to resolve errors and want to download a CSV that includes the updated data.
-
Select Update.
CloudZero displays a message stating how many records it successfully updated. The updated records appear in CloudZero after the next data ingest.
Delete a Telemetry Stream
To delete a unit cost metric or allocation telemetry stream through the Telemetry Streams page:
- Select the three-dot icon in the Actions column for the stream you intend to delete.
- Click the Delete Telemetry Stream button.
- Type the name of the stream into the dialog box.
- Select Delete.
To delete a telemetry stream through the stream's details page:
- Click the Delete Stream button.
- Type the name of the stream into the dialog box.
- Select Delete.
CloudZero completes the stream deletion within one hour.
Updated 4 months ago
